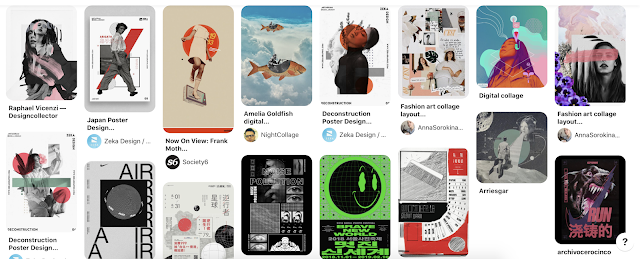
Fig 1.1: My Pinterest board so far
SOURCE: https://www.pinterest.com/seeeerrrr/dpi/
I liked this task a lot because it excited me to be able to create works like this using Photoshop and Illustrator.
Photoshop works
Fig 1.2: A photoshop work that I like SOURCE: https://condesade.tumblr.com/post/94738333149/bunny-seduction-condesade
The composition of this work is what fascinated me the most. It appears to be chaotic at first but with a closer look all elements of the work are balanced and in harmony with each other which makes it pleasing to look at.
Mr. Fauzi introduced us to various blending modes in Photoshop and how we can use them successfully.
Fig 1.3: Lecture slides
We were tasked with an assignment to create a composition using the blend modes and images provided.
2. Tutorial/Practical
Hearst Mansion We were introduced to Adobe Photoshop and our first task using the software. We looked at previous student works to gauge what the task consisted of. Our first task is to photoshop ourselves into the Hearst Mansion.
To practice first, we had to Photoshop Shazam into the mansion.
Fig 1.2: Shazam SOURCE: Lecture
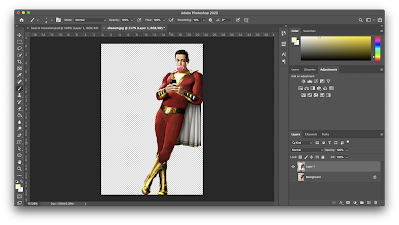
I started by opening this picture in Photoshop and then cutting him out from his background using the Selection Tool.
Fig 1.3: Cutting out in Photoshop
I then copied my layer and pasted it into the Heart Mansion file. Naturally, the lighting of the two pictures did not match so I added some adjustment layers to make it seem more real.
Fig 1.4: Adjustment layers added
I added a clipping mask to the adjustment layers so that they would only effect the Shazam layer and not the entire background.
Fig 1.5: Screenshot from Photoshop, progress
I added the shadow and reflection to make it more realistic.
Fig 1.6: Final work
Mr Martin gave us a recap into digital imaging and Photoshop for our tutorial lesson
Fig 1.7: Tutorial slides
After the recap, we started work on the other part of the exercise which was to Photoshop ourselves into the Hearst Mansion in the same way as Shazam. The first step was to take a picture of ourselves in a way that would fit the mansion.
Fig 1.8: My picture
I took this picture and made sure there was a window to the left because in the Hearst Mansion there is also a big window on the left. This would help balance out the light and make it look more realistic.
Fig 2.0: Final work
Sunset House task:
Our second exercise to introduce us to Photoshop, was to combine three images into one.
Fig 2.1: Our original three images
I started by cutting out the house and the cowboy and placing them in front of the sunset view. As expected, the lighting and colours did not match so I added some adjustment layers the way Mr. Martin and Mr. Fauzi taught us.
Fig 2.2: Adjustment layers
Mr. Martin also taught us how to use the Gradient Tool and the blending modes to create balanced light.
Fig 2.3: Gradient layer
I used a blue gradient to balance out the bright yellows and the gradient to create an even distribution of light through out all the layers.
The cowboy felt a bit artificial to me so I decided to add some strokes with the Eraser so it would appear as if he is standing in the grass.
Fig 2.4: Cowboy in grass
I then used the brush tool to emphasise some of the shadows and create some. My final result is below.
Fig 2.5: Final work
For this week, Mr. Martin gave us a tutorial on how to recolour black and white images.
Fig 2.6: Example image used by Mr. Martin
He started ooff by creating a mask layer in Photoshop and so I did the same.
Fig 2.7: Layer masks
After we created the layer masks, we added a solid colour adjustment layer and set the blend mode to soft light. We then moved the layer mask to adjustment layer.
Fig 2.8: Solid colour layer masks
After adding the colour, I realised some of the layer masks were not covering everywhere I wanted to. So I selected the mask and clicked select and mask which allowed me to manually refine my mask.
Fig 2.9: Adjusting my layer mask
After colouring in, I realised that more adjustments needed to made so I added other adjustment layers to balance it.
Fig 3.0: Adjustment layers
These really improved the final outcome.
Fig 3.1: Final work Recolouring task
After following along to Mr. Martin's tutorial we had to pick a picture ourselves from the folder he shared and recolouring it using the same steps.
Fig 3.2: The picture I chose
Fig 3.3: Final result after following the same steps
Hybrid animal/ displacement map
Mr. Martin showed us how to use displacement maps in class and we followed along.
Fig. 3.4: Starting picture
The first step was to make the picture black and white and add a bit of gaussian blur to and then save it as psd.
Fig 3.5: Animal skin texture
Then we opened the black and white file and created a displacement map of this skin over the cat.
Fig 3.6: Final result
After following Mr. Martin's tutorial, we had to do the same using animals of our choice. I chose a dog and cheetah
Fig 3.7: Original two pictures
Fig 3.8: Creating displacement map
Fig 3.9: Final Result
W1/2/3: We didn't submit any work so far.
W4/5: Mr Fauzi gave me feedback on some of the small compositions we made. He liked all my compositions and said that I was on the right track.
4. Reflection
W1: After the first week, I've felt a bit overwhelmed and unsure that I will be able to produce the high quality works that are required. Nevertheless, I have been assured that my lecturers will guide me throughout and help me not only learn new things but also master them. I look forward to using Photoshop and other Adobe software and creating art.
W2: I have gained more confidence in using Photoshop as we learn more about using the Selection Tool and adding effects. I didn't find the Shazam task too challenging which means my skill and knowledge of Photoshop are increasing. However, I know the exercises are gonna get harder as we go on so I am a bit anxious for that.
W3: I enjoyed learning about the blend modes and experimenting with them to create a few compositions. For the task of Photoshopping myself into the Hearst Mansion, it wasn't too challenging but I realised it took me longer than the Shazam exercise to make it more realistic.
W4/W5: Mr. Martin's practical's are really easy to follow and I enjoy doing it along with him. I have actually never used layer masking in Photoshop before but it turned out to surprisingly easy and I am really pleased with the outcome of the recolouring task. | 


Comments
Post a Comment